
Getting Started for Developers
Get started using the NCI Design System (NCIDS) by installing Node and npm (recommended), using a Content Delivery Network (CDN), or through a direct download of the NCIDS files.
This page provides a step-by-step guide on how to install, compile, and customize your code using Node and npm. Options to use the CDN or a direct download of the NCIDS for your project are also provided. Please reference our contact information if additional support is needed.
Node and npm
Step 1: Install Node and npm
NCIDS distributes our source code through a node package manager (npm), which uses a flavor of JavaScript called Node.js. We recommend using the NCIDS via npm because it provides more flexibility through its modular approach. The best way to add NCIDS to your project is with npm via a Terminal window. (Check out some tips for using Terminal on a Mac or Windows.)
Installing the Design System with Node and npm not only allows you to install all the code the Design System needs to compile with just a couple commands, but will version any installed packages, like NCIDS, as well — meaning your project code is tied to a specific version of the Design System. Confirming what version you’re using and updating to a newer (or older) version is straightforward.
To download fonts, refer to the Typography page.
Step 1.1: Install Node
-
Ensure that you have Node.js installed, preferably Node 18, to meet the required runtime environment.
-
Open your Terminal application and a Terminal window. Check to see if you have Node installed with
node -v.
If you don’t have Node, we recommend installing it through a node version manager such as Node Version Manager on a Mac or Linux machine, or nvm-windows on a Windows machine. It can also be installed directly from Node.js.
Step 1.2: Authenticating to the NCIDS npm registry
NCIDS utilizes GitHub’s npm registry to host its packages. To access and download these packages, you need to be authenticated with a valid access token.
-
Create your personal access token. Follow the steps outlined in GitHub’s documentation for creating a personal access token (classic). Ensure that, at a minimum, the required scopes are set to
read:packages: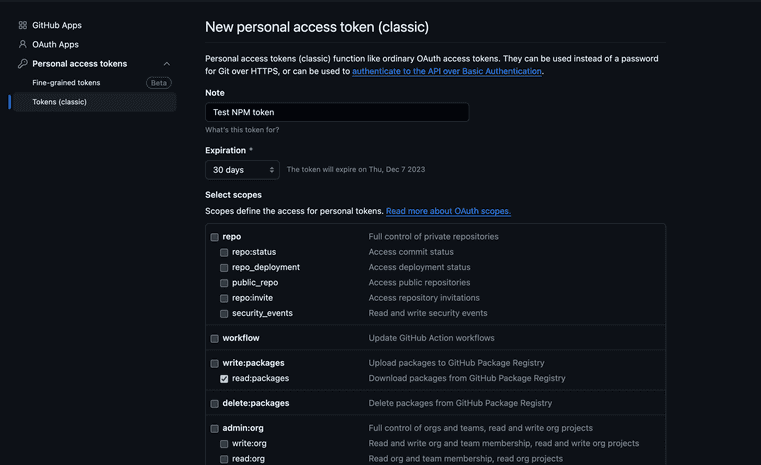
-
Log in to the @NCIOCPL Organizational Scope on npm. If you are using npm 9+, run the following command to log in to npm with the organizational scope and using the GitHub npm registry:
npm login --scope=@NCIOCPL --auth-type=legacy --registry=https://npm.pkg.github.com -
You will be prompted to enter your username and password. Please be sure to use your new classic personal access token as your password:
> Username: <USERNAME>> Password: <TOKEN>If you are using npm less than 9, log in without the legacy option:
npm login --scope=@NCIOCPL --registry=https://npm.pkg.github.com -
And follow the prompts to enter your email and password. Enter your token as your password.
> Email: <USERNAME>@users.noreply.github.com> Password: <TOKEN>
For more details, see authenticating with a personal access token.
Step 1.3: Initialize Your Project in Node
- Once you have Node and npm installed, go to the root of your project directory in Terminal. The root is the topmost directory associated with your project, the directory that includes all your project files and directories. In Terminal, the root will read as follows:
cd path/to/project/root
- Initialize your project to create a file called package.json. Once you have this file, you can use npm to install software (or packages) like NCIDS.
npm init
This initialization will start a series of prompts at the command line. Usually the defaults (which are noted in parentheses) are okay for a simple project. You can always edit these values later.
In order to download the NCIDS, you will have to set up the @nciocpl organizational scope in npm to see the package. Create a .npmrc file in the root of your project containing the following:
@nciocpl:registry=https://npm.pkg.github.com
Step 1.4: Install NCIDS
NCIDS requires both sass and postcss packages as peer dependencies. npm
will install these by default, but other package managers may not install
these by default.
- Now, you can install NCIDS into your project from the command line with npm. At minimum, your project will require the
ncids-csspackage. Install it via the command line:
npm install @nciocpl/ncids-css
- In order to use the javascript components, download the
ncids-jspackage separately. Install it via the command line:
npm install @nciocpl/ncids-js
Don’t modify the source code. Now that you’ve installed the NCIDS source code, it is controlled by npm and could be rewritten at any time.
Step 2: Compile and Import
Step 2.1: Use a Sass Compiler
When using NCIDS, you must use Dart Sass—a modern Sass compiler that can parse Sass Module syntax. This process will convert the work you’ve done on your style sheet in Sass into Cascading Style Sheet (CSS).
For NCIDS, we require the version of Dart Sass to be >=v1.69.0 and <v1.77.0
To compile your code properly, developers must do the following:
- Autoprefixing: NCIDS requires Autoprefixing your CSS with a specific .browserslistrc.
- Sass Load Paths: NCIDS requires Sass compilers use Load Paths that reference the /packages directory in the U.S. Web Design System (USWDS) package.
Apply Autoprefixer
The design system requires autoprefixing to work properly. Don't add vendor prefixes to your custom styles manually—it is more reliable to use autoprefixing.
We use the following autoprefixer settings via .browserslistrc config:
> 2%last 2 versionsnot IE 11not dead
How to use Sass Load Paths
ncids-css requires Sass Load Paths to compile for use in your project.
Load paths must include a path to the /packages directory for NCIDS packages and /uswds-packages for USWDS packages. An example using Webpack might look like:
Step 2.2: Import the Compiled Package
This next step consists of creating the Sass style sheet. For more detailed instructions on how to setup your project, visit our example app repository.
- Create a Sass style sheet in your project and import the required Sass partials:
@use 'uswds-core' with ($theme-image-path: '@nciocpl/ncids-css/uswds-img',);@forward 'uswds-global';
-
Add the packages from the NCIDS library that you need or add the entire NCIDS package library:
Recommended option 1: Import only the packages you need. (recommended)
@forward 'nci-header';@forward 'usa-breadcrumbs';@forward 'usa-footer';
Option 2: Import the entire ncids-css library.
This is not recommended due to the file size that will be generated.
@forward 'ncids';
- Create an index.js file. This is the entrypoint file set in the compiler of your project:
import './styles.scss';console.log('hello world');
How to import and manage your Sassy Cascading Style Sheets (SCSS)
The @use and @forward directives are used to import and manage Sassy Cascading Style Sheets (SCSS) modules and partials.
-
@usedirective allows you to import and use functionality from other SCSS modules. It provides better encapsulation and avoids conflicting global CSS class names. Use it to import SCSS modules that contain reusable styles, mixins, variables, or functions. -
@forwarddirective allows you to re-export styles from one module to another. It acts as a bridge between different SCSS modules, making styles available for import in other files. Use it when you want to expose certain styles or functionality from one module to be used in another.
Note: The load paths option for importing Sass partials or modules is specific to Dart Sass. If you're using another Sass implementation, such as Node Sass, LibSass, or Ruby Sass, the load paths option may not be available. Make sure to use the appropriate load path mechanism specific to your chosen Sass implementation.
Step 3: Customize
Customize the design system with settings and custom code.
The USWDS Settings page describes each of the settings available in the settings files, as well as the values the settings accept. Most settings accept design tokens. Visit the Foundations section of our website for more information on the available tokens for color, spacing units, font size, and more.
Content Delivery Network
While using the NCIDS via npm is recommended, there are three options to use the NCIDS via Content Delivery Network (CDN) - these options include using the NCIDS Minimal, NCIDS without utilities, and NCIDS with utilities. Choose the option that works best for your use case.
The CDN allows you to use the NCIDS without installing, compiling, or customizing the code. To do so, directly include the stylesheet and JavaScript in your HTML. Then update your HTML to utilize the NCIDS CSS classes.
NCIDS Minimal
For a minimal configuration of the NCIDS, use the tags below:
NCIDS Without Utilities
For the standard configuration of the NCIDS, but without utilities, use the tags below:
NCIDS With Utilities
For the full configuration of the NCIDS, including utilities, use the tags below:
Direct Download
You can download the NCIDS files to use on your site. Simply include the NCIDS folder in your website assets and add the stylesheet and JavaScript to your pages directly.
Download here: ncids-v3.5.1.zip.
<linkhref='your/assets/path/ncids-v3.5.1/ncids.min.css'rel='stylesheet'/><scriptsrc='your/assets/path/ncids-v3.5.1/ncids.min.js'></script>
In the zip file, you will find the same three versions available as on the CDN: minimal, without utilities, and with utilities.